Top 5 life drawing tips for creating accurate and expressive drawing
The life drawing (or observational drawing) process and tips below are designed to help you create a drawing that’s true to likeness, expressive and with dimensions.
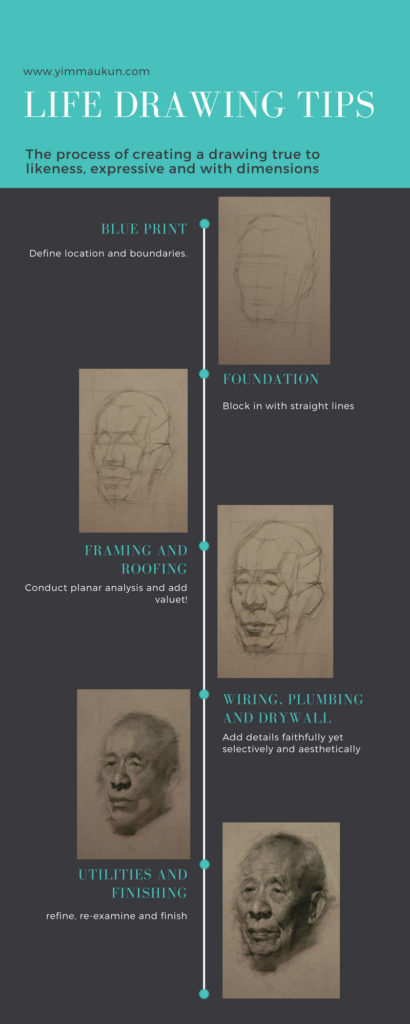
Observe holistically, define locations and boundaries
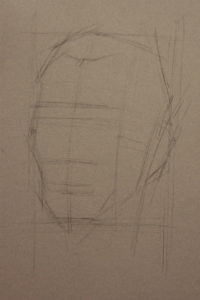
Think of this step as drawing a blue print when you build a house. Hold up your pencil with your arm, squint your eyes to assess the proportions of major parts. Use long, straight lines to mark the position of the head – the top, bottom, left and right boundaries. Draw reference lines for the nose, eyes, eyebrows and mouth.
Block in with straight lines
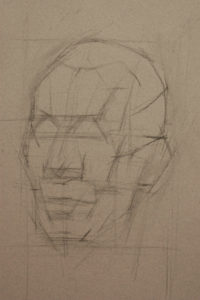
During this stage, block in not only the form, but also major tonal shapes, for example, the shadow beneath the nose and the shadow beneath the mouth. Including major tonal shapes in the block-in helps you create dimensions for the drawing. The key is using straight lines. Using straight lines makes it easier to compare and make revisions and reduce the likelihood of making mistakes. Avoid drawing details at this point. Using the same analogy of building a house, this is the stage of building a solid foundation for the house before adding wiring, plumbing, etc. later.
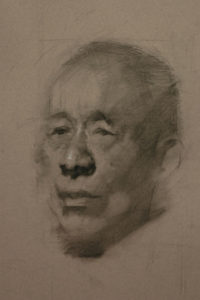
Conduct planar analysis and add value

This is a somewhat abstract process. Being able to see the planes and define them takes some time to get used to. A drawing is essentially composed of points, lines and planes. And upon this foundation, we add values and details. Or in the house construction analogy, this is roofing and framing stage where all the parts and features are accurately defined.
After the features are defined, add values. First shade the dark value areas and then the middle value blocks. Don’t make the dark areas too dark at this point. Instead, replace the dark with gray so that it’s easier to modify the dark areas later.
Add details faithfully yet selectively and aesthetically
Details and value gradation can be added using a variety of tools such as white pencil (for highlights and the white collars), paper blender, tissue paper, or even your fingers to soft edges. Keep in mind that the process of adding details is a process of iteration with addition and subtraction. Render the details of variation in value and edges using diversified pencil strokes. Keep in mind that this is a drawing, not a photo, so the emphasis should be how to render details selectively and aesthetically to convey the spirit of the subject and your own interpretation.
Using the house construction analogy, this is the stage when wiring, plumbing and drywall are installed.
Reexamine everything and know when to stop
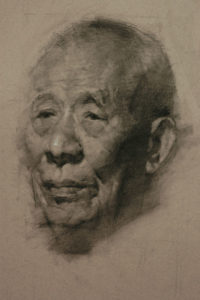
Step back and examine the drawing in its entirety. Is it faithful to the subject in likeness? Is it faithful to the subject in spirit? Reexamine the value. There should be the light, the midtone and the dark. Each of these major values should be further divided into three more values. Reexamine the edges. They should have rhythm, spatial relationships and variation. When is the time to stop drawing? This of course depends on personal preference. However, as a rule of thumb, since this is a drawing, not a photo, it’s not possible nor is it necessary to include every single detail (for example, it’s not necessary to render every single hair). So if you feel the drawing is faithful to the subject in likeness and spirit, and you’re happy about the amount of details in it. Then it’s time to stop.
Using the house construction analogy, this is the stage you add the utilities and final touches to the house.
For more information about life drawing, please refer to
Lessons in Masterful Portrait Drawing
